

How To Make Window Blinds At Home
A classic Roman blind is a simple but cute way to dress a window. Roman blinds offer a smart and highly-practical solution to blocking out the lord's day, while calculation color and pattern to dress windows – a keen way to enhance fashionable curtain ideas.
The difference between a roller bullheaded and a Roman bullheaded is the method in which it opens. Unlike a roller blind, which equally the name would suggests rolls downwards, a Roman blind gently folds down layer by layer. The pattern is stacked rather than rolled, which offers a more polished finish with the blind is raised. Our design uses lining material, rings, eyelets and dowelling for a neat, professional person look.
Come across our pace-by-pace guide to brand your own Roman blind, to dress any window in whatever room.
How to make a Roman Bullheaded

Image credit: Future PLC/ Jeremy Phillips
Notation: Before y'all embark on your blind project, take a expect at the latest rules and regulations on blind safety. Visit makeitsafe.org.uk for up-to-date information
What you will need
- 2.5cm-square wooden batten the width of the blind
- Length of self-agglutinative claw and sew-on lop fastener the width of the batten
- Main fabric
- Lining fabric
- Matching thread
- Lengths of narrow wooden dowelling, the width of the finished blind minus 3cm
- Decorative trim or braid (optional)
- 12mm plastic rings
- 4 screw-in eyelets
- Wooden bullheaded pull, painted if preferred
- 3 lengths of cord, each the width of the finished blind plus twice the length
- Wall cleat
Not sure how to measure upwards? See our video how to measure Roman blinds
1. Fix your bullheaded's supporting structure
Attach the batten above the window frame and printing the cocky-adhesive claw fastener along the forepart of the batten.
2. Work out the size of your blind
Measure from the top of the batten to your required finished drop, adding ii.5cm each for the meridian and bottom hems. For the width, measure the length of the batten and add 2.5cm for each side seam. Cut out your main and lining fabrics to these measurements.
3. Line your blind
Right side upwardly, lay out your main fabric on a apartment surface. Place the lining textile on top, matching raw edges all round. Pin all round then stitch the side and bottom edges, taking a ii.5cm seam. Remove pins.
4. Create dowel pockets
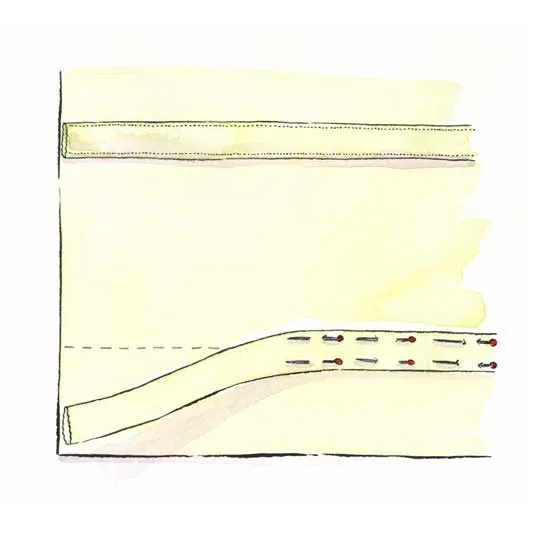
Illustration by Michael A Loma
To create a dowel pocket along the bottom border, stitch a 2d line of stitching 6mm from the raw edge. Insert dowel. Trim seam allowances and turn through and printing.
5. Create the pleats
Lay the blind lining side up and measure 5cm from the tiptop of the blind. Mark with a pencil line across the width of the blind. Divide the remaining length of the blind into 20cm to 30cm pleats, finishing with a half pleat at the bottom. Mark each section with a pencil mark as before.
six. Make pockets to hold the dowels at each of the pleats
Cutting 8cm strips of lining material to the width of the blind for each of the marked pencil lines. Fold each strip in half along the length and stitch the long raw border and one end, taking a 1cm seam. Plough through and press.

Illustration by Michael A Hill
Centre the pockets along the marked pencil lines and pivot and tack in identify. Motorcar stitch each long edge, through all thicknesses, existence careful not to pucker the material.
8. Set up the dowels in place
Slide the dowels into the pockets, turning under the remaining raw edges on the pockets and sideslip stitching to hold dowels in position.
nine. Add the plastic rings
On each pocket marking the eye indicate of the blind and sideslip stitch a plastic ring in place. Repeat 5cm in from each side edge of the bullheaded on each pocket (see illustration).
10. Make the top hem
Turn the raw edges of the main material and lining fabric to the back of the bullheaded by 2.5cm, printing and tack. Sew the run up-on loop fastener in place, close to the fold.
11. Trim your blind
Cut a length of decorative trim or braid to the width of the bullheaded and slip sew together in place forth the bottom edge. Hang the bullheaded from the batten.
12. Adhere the eyelets
Screw 3 eyelets to the underside of the batten so that each aligns with each row of plastic rings on the bullheaded. Screw a fourth eyelet to the border of the crossbar where the cords volition fall and where the bullheaded will be operated from.
13. Adhere and tighten the cords

Illustration by Michael A Colina
Video Of The Week
Necktie each length of cord to each of the 3 rings on the lowest pleat. Then thread each length of cord through each of the rings above it, and through the eyelets, finishing on the working side of the batten. Trim the cords to a suitable length and attach the blind pull (painted in a complementary colour if you prefer). Gear up a cleat in place on the wall and use to secure the cords.
If yous're looking become crafty, why non outset at present with our step-by-step guide to transforming your windows?
Source: https://www.idealhome.co.uk/diy-and-decorating/how-to-make-a-roman-blind-craft-idea-85817
Posted by: reedindraviverry.blogspot.com
0 Response to "How To Make Window Blinds At Home"
Post a Comment